
How to create an icon in Paint

If you're using Windows, creating your own icons using Paint is possible. These icons can be customized and used on any application you wish. However, you will encounter some limitations along the way since Paint is not a comprehensive graphic design tool. Continue reading this article to find out how to make icons in Paint.
How to create an icon with Paint?
First of all, you have to consider that Paint is not the best program to create graphic design items, however, it can be a great tool to edit one or try out some forms and tools.
- To get started, open Paint by going to Start > All Programs > Paint.
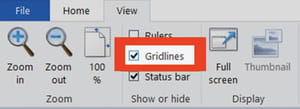
- Enable gridlines to facilitate the process of drawing: click on View and checkmark the Gridlines box. Then, return to the Home screen.
- Next, go to Resize and select Pixels. Here, uncheck the Maintain aspect ratio option and manually type the size of the canvas in the Horizontal and Vertical tabs. For icon creation, the best option will be 32 x 32 pixels. Click OK.
- To make it easier to work on the canvas, zoom it by clicking on the Zoom (+) icon as many times as you need.
- Draw your icon. When you are done, save it by doing so: click File > Save as. Click Other formats in the pop-up menu and type the name of the icon followed by .ico. Save your file and click OK.
More Windows questions? Check out our forum!
Subject
Replies