How to create TeamSpeak client and server
TeamSpeak is a popular software that is often used by gamers to create servers and chat channels to communicate with each other while playing multiplayer games. In this article, you will learn how to create a server using this program.
How to install TeamSpeak 3 client and TeamSpeak server
To create your own servers using TeamSpeak, you need to download two programs: TeamSpeak 3 Client and TeamSpeak Server. Both are compatible with Windows, Mac or Linux operating systems. You can download TeamSpeak 3 Client here and TeamSpeak Server here.
When downloaded, first, run the TeamSpeak 3 Client installation process. To do so, double-click on the program file, choose the language and accept the terms of use, click on Agree.

How to connect to a TeamSpeak server
With TeamSpeak 3 Client you can join a server that already exists. To do so, launch the application and login with your TeamSpeak account or create a new one if you’ve never used TeamSpeak software before.

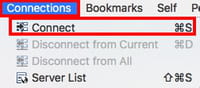
If you want to connect to a server, click on Connections > Connect in the menu tab.
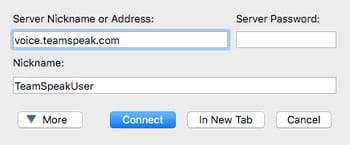
Enter your server address, the password and your nickname to get started and join the chat. Click on Connect.
How to create a new server
To create a new server with TeamSpeak on Windows or Mac, follow these instructions:
On Windows OS
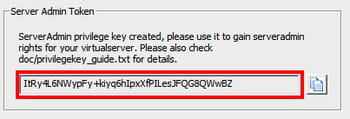
After downloading the TeamSpeak Server file, extract it and run the installer – file with ts3server.exe name. Accept the terms of use and save your privileged key to gain admin rights:
Finally, open the TeamSpeak 3 Client program and enter your IPv4 address in the Server Nickname tab, submit your nickname and click on Connect. The last thing to do is enter the privileged key that you saved at the beginning of the process.
On Mac OS
Open the TeamSpeak Server file and unzip it. Open the Terminal program by going to Finder > Applications > Utilities > Terminal. Open a new Terminal window and paste the command:
set TS3SERVER_LICENSE=accept
This way you will accept TeamSpeak Server’ terms of use.
Next, go to your TeamSpeak Server folder by entering this command in the same Terminal window:
cd Downloads/teamspeak3-server_mac
Then, start the Teamspeak Server in Terminal by submitting this command:
/.ts3server
Wait several seconds for the process to be completed and save the privileged key that appears on your screen.

Finally, connect by using your TeamSpeak 3 Client: enter your network address (IPv4) and your nickname, then click on Connect. Enter your privileged key to get server admin’s rights:

Now you can use your own server and easily chat with and call your friends.
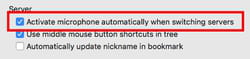
How to automatically activate the microphone when switching servers
If you use multiple servers, you might need to sometimes switch between them. To make it fast and easy, you can automatically activate the microphone when switching. To do so, follow these simple steps:
Open your TeamSpeak 3 Client and go to Settings. Select Application > Server:

Checkmark the Activate microphone when switching servers tab, then click Apply.